Cinnabon’s Cinnamon Rolls – a Cinnabon copycat recipe. Super easy to make, I must add. My family loves the cinnamon rolls that we get at Cinnabon. They are our absolute, all-time favorite dessert.
For some time now, I had been wanting to make these rolls at home. I researched for a recipe on the internet. There is no original recipe shared by the company, however, I did find a number of blogs who had tried to recreate the recipe. Using the recipes as my starting point I was ready to starts my experiments!
The recipe I share today is the closest I got to the Cinnabon Cinnamon rolls. The original Cinnabon’s cinnamon rolls are made with margarine, however, I have used butter in my recipe (I didn’t have margarine available at the time but if you do, please use that instead).
There is just something about warm fluffy cinnamon rolls, straight out of the oven. They are fresh and warm, ooey-gooey, and simply melt in your mouth. Just perfect for breakfast. My kids have been eating this every day for the last 2 weeks. Truly nothing beats homemade food. The effort put into making them is so worth it. The only thing that could make them better is chocolate and that recipe I’ll share with you another time ( I have started working on that).
If you’re kneading by hands, be prepared to get your hands messy. Personally, I like kneading with my hands. I find the monotonous motion of pushing the dough away from myself and rolling it back very calming. I often find myself daydreaming when I am kneading. The dough is sticky and soft, don’t panic just rub a little oil on your hands and continue to knead. It does get better as it is kneaded more and will stop sticking to your hands. If required add 1-2 tablespoon more of flour and continue to knead.
The rolls don’t last very long as my kids keep coming back for more. The only complaints my sons have made after having their second or third cinnamon roll are, “if only I hadn’t eaten lunch” and “can you please make them bigger?”.
To have them fresh from the oven, in the morning for breakfast, place the rolls after step 14 on the baking tray, cover with a cling wrap and place in the fridge for an overnight slow rise. In the morning take them out from the fridge and rest on the kitchen counter for 30 minutes and then bake in a preheated oven until golden brown.
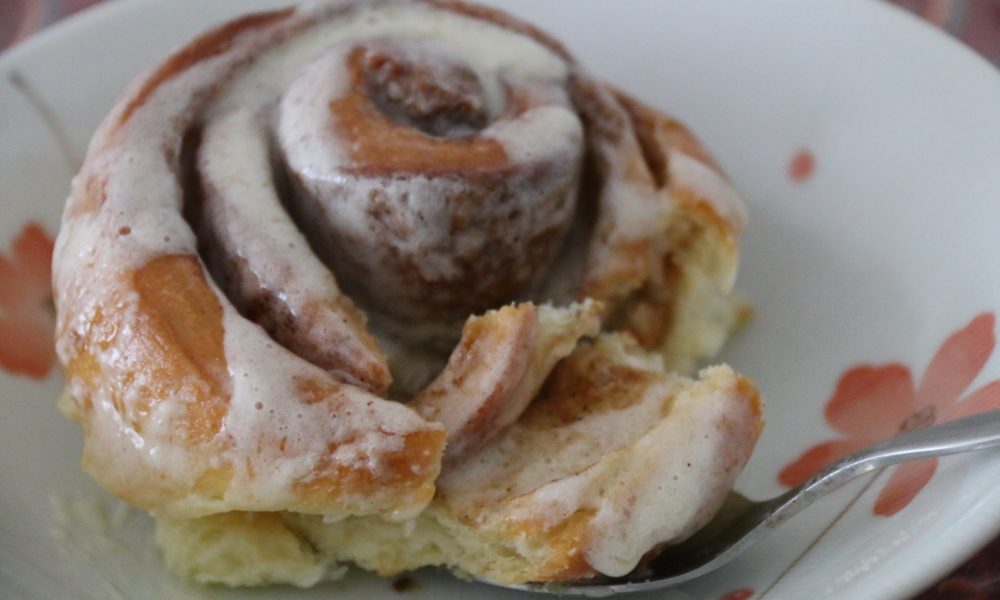
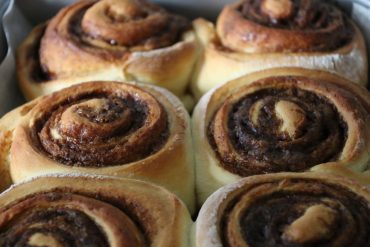
If you like your frosting melting then pour when the buns are warm (around 5 minutes after they are taken out from the oven). If you can wait then wait for the rolls to cool down and then frost. I just couldn’t wait so I had my frosting melting on the buns. It is really hard to resist a warm cinnamon roll fresh out of the oven.
Happy baking!
Cinnamon Rolls Copycat Cinnabon Recipe
Servings: 12 Rolls
Ingredients
Dough
- 2 1/4 tsp (7 g) active dry yeast
- 1 cup (250 ml) warm milk
- 1/2 cup granulated sugar
- 1/3 cup (75 g) margarine, I used softened butter
- 1 tsp salt
- 2 eggs (beat lightly with a fork)
- 4 cups (500g) all-purpose flour
Filling
- 1 cup (200g) brown sugar
- 3 tbsp cinnamon powder
- 1/3 cup (75g) margarine, softened
Cream cheese frosting
- 6 tbsp (113g) margarine, I used butter
- 1 1/2 cups (187g) powdered sugar
- 1/4 cup (55g) cream cheese
- 1/2 tsp vanilla extract
- 1/8 tsp salt
Instructions
Making The Dough
- In a bowl, dissolve the yeast in a warm cup of milk with 1 teaspoon of sugar. Set aside for 10 minutes till foamy. If the mixture doesn’t foam up and get frothy, toss it and start again. It’s crucial to proof the yeast right so that the dough can rise properly.
- In another bowl add the remaining sugar, salt, and flour and mix well with a spoon.
- Make a well in the center of the flour and add butter (or margarine preferably) and eggs.
- Pour the milk/yeast mixture into the bowl with flour and eggs.
- Using a wooden spoon mix the dough and the liquid. The dough will be sticky.
- Flour the kitchen counter generously and dump the dough on the counter. Now knead the dough for 10 minutes till it is smooth. If the dough feels too sticky, oil your hands and knead. The dough has to be soft if after kneading for 5 minutes it still feels sticky sprinkle 1-2 tablespoons of flour over the dough and kneads again.
- Place dough into an oiled bowl, cover and let it rise in a warm place for about 1 hour or until the dough has doubled in size. May take longer in the cold weather.
- Preheat oven to 175 C degrees. Grease a 9×13 inch baking pan or place baking paper in
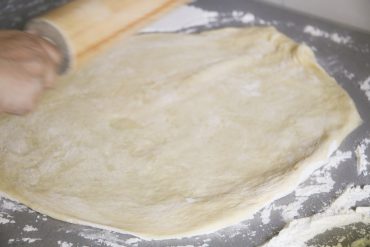
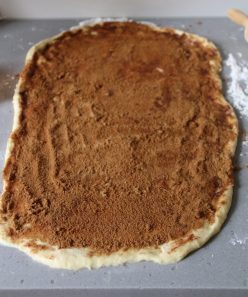
- Move the dough from the bowl onto a lightly floured work surface. Knead a few times. Lightly flour the kitchen counter again and dust the rolling pin with flour. Using the rolling pin, roll the dough out, until it is approx 16 inches long by 12 inches wide. It should be approx 1/4 inch thick. Don´t roll out the dough too thin, or the finished buns will be tough and chewy rather than soft and plump.
Filling and Shaping of Rolls
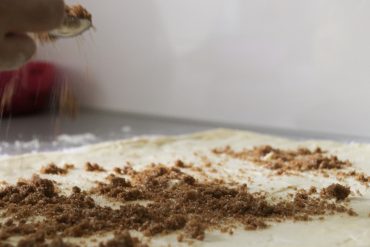
- To make the filling, combine the brown sugar and cinnamon in a bowl. Mix well with a spoon.
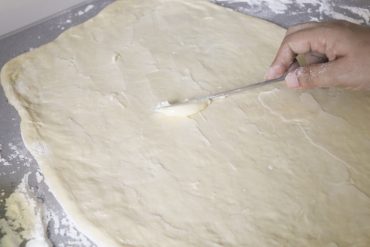
- Spread the butter first on the dough using a knife and then sprinkle the brown sugar and cinnamon mixture over the surface of the dough.
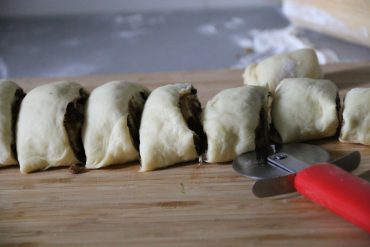
- Working carefully, from the long edge, roll the dough down to the bottom edge into a cigar-shaped log. The roll should be about 18 inches in length.

- Place the seam side of the roll down and cut the roll into 1 1/2 inch slices you will get 12 pieces. I like to first cut the dough in half and then each half in half so you end up with 4 even pieces. Then cut each piece into 3 pieces.
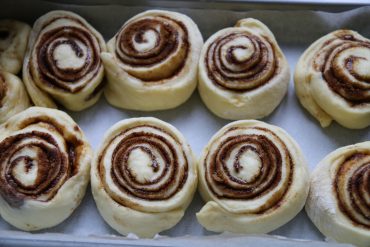
- Place the cut rolls approx 1/2 inch apart so that they aren´t touching but are close to one another in the prepared pan. Cover them with a damp towel. Let them rise again for another 30 -60 minutes until they double in size. It may take longer in cold weather. At this stage, they can be placed in the fridge for a slow second rise, especially if you are planning to make them for breakfast the next day.
Baking
- With the oven rack in the middle shelf bake for 15 minutes or until light golden brown. Make sure to rotate the pan halfway through baking, to ensure even browning. Cooking time can vary to 20 minutes but mine was ready in 15 minutes.
Frosting
- While the rolls are baking make the frosting by mixing all ingredients and beat well with an electric mixer until fluffy.
- Remove from the oven and allow to cool down slightly in the pan.
- When the rolls are still warm, spread generously with frosting (not hot, but warm). The warmth from the buns will melt the frosting somewhat, causing it to get into the different layers of the buns. Delicious!
Storing Rolls
- You can store any leftovers (what leftovers?) at room temperature for up to 2 days. Just make sure you wrap them very well in plastic wrap. The last thing you want is for the rolls to dry out. Just rewarm in the microwave (for a few seconds) or toaster oven for a minute or two before eating the next day.
- To store for a longer period bake off the rolls, allow them to cool off completely and do not frost them. Then wrap super tightly in plastic wrap and pop them into the freezer. They will keep for several weeks. Just rewarm in a preheated 170 C degrees oven for about 10 to 15 minutes (since they are frozen) and frost right before serving.
If you’re using a stand mixer, follow the instructions below:
Directions:
- Dissolve the yeast in the warm milk with 1 teaspoon of sugar in a bowl. Set aside for 10 minutes till frothy.
- In the bowl of an electric stand mixer, cream together the sugar, salt, and margarine or butter on medium-high speed with a paddle attachment.
- Add the eggs in 1 at a time and continue mixing till smooth.
- Then add the flour, yeast, and milk. Mix on low speed until the dough forms a ball.
- Switch to the dough hook and increase the speed to medium, mixing for approx 8-10 minutes.
- You may have to add a little flour or water while mixing if dough seems sticky or dry.
Follow the remaining recipe from step 7 and onwards.
I love cinnamon rolls because you don’t really know if they’re breakfast or dessert. I think they can pass off for either one, really. People eat them for breakfast all the time. These for sure are more of a dessert or late afternoon snack. The next time you have a craving for some something sweet make these cinnamon rolls. Sure, they are a bit of work, but cinnamon rolls are always worth it. Enjoy!


Leave a reply